Mission Type: |
Main Mission |
Section: |
Ubersreik Act 1 |
Chests: |
21 |
Tomes: |
3 |
Grimoires: |
2 |

| |
Synopsis[ | ]
The Wizards Tower is a mission in the 1st act of the base game. The heroes must climb the enigmatic wizard's tower belonging to Christoph Engel and negotiate the continued protection of the Red Moon Inn, the base of operations for the Ubersreik resistance.
Areas[ | ]
Wizard's Way[ | ]
A section of town block before you enter the Wizard's Tower. Check the cart blocking the road on the left of the Apothecary as it may have consumables.
Cordelia's Apothecary Shop[ | ]
A potion or two at the very least should be sitting somewhere within the shop front, along with a few skaven "hiding" about. Make your way down the stairs to the library below.
There will be a book-switch to your left at the bottom, interact with it and the shelf will pull back, revealing a hidden passage.
Secret Passage[ | ]
A chest lies half a floor above, reachable if you jump from the staircase leading up. Otherwise, this area's not very notable aside from the fact that horde spawns frequently occur here. Proceed up the steps, through the door, and to the right to enter the next area.
Main Library[ | ]
The first tome lies in a room directly above the last point of the Secret Passage. Climb the steps to your right to the top floor and find the room along with a few supplies.
To reach the next area, there are two ways: above and below. The route above takes a jump and overlooks the ground floor of the next area while the route below leads straight to it.
The Stairway[ | ]
There may be consumables on the chest to the ground floor or scattered about it. Climb the stairs to the top where a tome with healing supplies and an ammo cache will be behind iron bars, requiring you to go around it. The first grimoire will be stashed in a room out of the way at the wooden intersection.
Once you have what you need, push through the wooden intersection and continue down until you see a chest directly in front and a large opening to drop down on the right. Next up is the first event.
Point of No Return: Once you drop down and proceed to the Chamber of Gnignol, you will not be able to return to the previous areas. If you have not collected two tomes and a grimoire at this point, note that they will no longer be accessible.
Chamber of Gnignol[ | ]
One unique feature of this room is that depending on the character you choose to play as, the room will offer a different appearance:
- Victor Saltzpyre (Witch Hunter) - Sub-ground torture dungeon in the nighttime with jail cells and a witch pyre.
- Kerillian (Waywatcher) - Forest Biome in the noontime.
- Bardin Goreksson (Dwarf Ranger) - Dwarven chamber with gold coins scattered about.
- Sienna Fuegonasus (Bright Wizard) - An array of flaming pyres burning in the night.
- Markus Kruber (Empire Soldier) - A rural village area in the morning countryside
Regardless of appearance, the chamber is structured exactly the same for all characters. An ammunition cache lies at the top of the 2-layered platform and the way forward is blocked by a large door much like the floodgates in Smuggler's Run. Break the lock in the center of the chamber and defend against a few hordes of skaven. Once the gate is down, pass through and into the next room.
Drop down to the ground floor and make your way up the steps and through the narrow tunnel to the next area.
Point of No Return: Once you drop down to the lower level, the Chamber of Gnignol will no longer be accessible. There isn't anything notable to retrieve, but this will be the last point in which you can restock ammunition and retrieve a few consumables that may have been lying about the chamber.
Hall of Mysteries[ | ]
Chests are placed in all directions, even upside down. The Hall of Mysteries will be the ground floor you will drop to should you ever find yourself knocked off an upper floor later.
Proceed to the end of the hall and make a left, pushing through a passageway. The third tome is directly above but will not be accessible until later.
From the Hall of Mysteries to the Hall of Knowledge is a one-way drop, but the Hall of Mysteries will still be accessible via a drop down from the Hall of Illusion.
Hall of Knowledge[ | ]
Supplies may be scattered and hidden behind and around bookshelves but other than an ammunition cache there isn't anything else worth noting. Proceed through the hall, up the staircase to the left and drop down to the next area.
Hall of Illusion[ | ]
The last section of the twisted corridors and technically the second floor of the Hall of Mysteries. To the left is the third tome hidden in a sideways chest. Across the chasm, up a poorly made staircase, and behind a door leading up (yes, up) is the second grimoire.
Push to the next room opposite the chasm and the illusions should end...at least...the ones about objects and areas defying gravity.
The Tower Hall[ | ]
Up the steps is the way forward but there may be supplies on the table in the forward-right direction (either go forward under the stairs then right or take a right, then left)
Head up the stairs, to the left, and drop down at the end of the hallway, grabbing whatever you find along the way.
Point of No Return: Once you have dropped down the platform into the next hall, you will not be able to return to the previous areas. If you have not retrieved the third tome and/or the second grimoire, they will no longer be accessible.
???[ | ]
(Note: This area is literally labeled as "???" in the game. It is not an unknown name.)
As you approach the narrow walkway, the room will flash white and turn into a bridge overlooking a bottomless pit in the middle of a wasteland. Push forward, fight through the horde, and past the door the wasteland illusion should break, even if you return to where the illusion started. Make your way up the steps and into the next room, where there should be medical supplies and ammunition lying about.
You are almost near the end, and arguably one of the more difficult mission events the game has to offer.
Point of No Return: Once you drop into the Grey Wizard's Study, you will not be able to return to the preparation room and restock ammunition/health. Any further aid desired before/during the final event will need to be met via supplies on the table in the center of the room or in the chests located about the area.
The Grey Wizard's Study[ | ]
Although you are asked to "persuade" the grey wizard to protect the inn, apparently he has already agreed to the idea and plans to re-cast the spell, protecting both the wizard's tower and the Red Moon Inn from here on out. Once ready, interact with the circle in the center of the room and prepare for a series of assaults from the skaven.
Initially you will see the healthbars of the 4 wards in each corner of the room appear. These represent objects you will need to protect from skaven attacks, but ignore them for now since they will not be under threat until later.
The first hordes that spawn will be focused on trying to attack the party. Bunker down in a defensible position and deal with them as needed. Once a horde or two has been eliminated, the grey wizard will say something along the lines of "It's working"
The next hordes that spawn will still be focused on attacking the party, though this time there will likely be special skaven mixed into the crowd. Eliminate these and the grey wizard will specifically request to have the wards defended.
Hordes after this will proceed to attack the 4 wards on each corner of the room, their ability to damage each ward greatly dependent on mission difficulty. Skaven may initially intend to approach the ward to attack and instead redirect to a nearby teammate to fight instead. Though rare, special skaven may show up with the intent to attack the party. Eliminate the hordes and the gray wizard will once again say something along the lines of "It's working".
The following wave of hordes will be the last, and special skaven are frequently hidden within, forcing party members to watch one another as well as the wards under attack.
If all 4 of the 4 wards about the study are destroyed by skaven attacks, the mission ends in defeat without allowing players to redeem themselves or restart the event. If enough wards remain intact by the end of the last horde, the study will shake and the grey wizard will comment on a spell well done, transforming the look of the study into one of an abandoned cellar and opening a doorway to the basement of Cordelia's Apothecary Shop from earlier, with the secret passage closed off. Proceed out of the apothecary and to the right, where Olesya's Carriage will be waiting. Once all player-controlled characters are securely inside the carriage with the door closed, the mission will end.
Tomes and Grimoires[ | ]
Tomes[ | ]
The first Tome can be found while climbing up the stairs in The Library. It's located in a room you come across.
The second Tome is located before exiting The Staircase, turn around and go down a flight of stairs for some loot and the second tome.
The third Tome will be found in a chest on the wall of an alcove to your left when climbing the The Hall of Illusion. To exit the alcove without going back down, climb on the lid of the chest once you opened it.
Grimoires[ | ]
The first Grimoire is hidden after The Staircase and the second tome, down a long corridor that ends in a dead end you will find a small room with a tall stack of books. The Grimoire is on top of the book stack.
The second Grimoire can be found after the third tome and at the exit of The Hall of Illusion, turn right and go back into the room. Following the wall to your left in The Hall of Illusion will lead you to a flight of stairs going up to a door; jump up those stairs and find the second Grimoire behind the door.
Map[ | ]
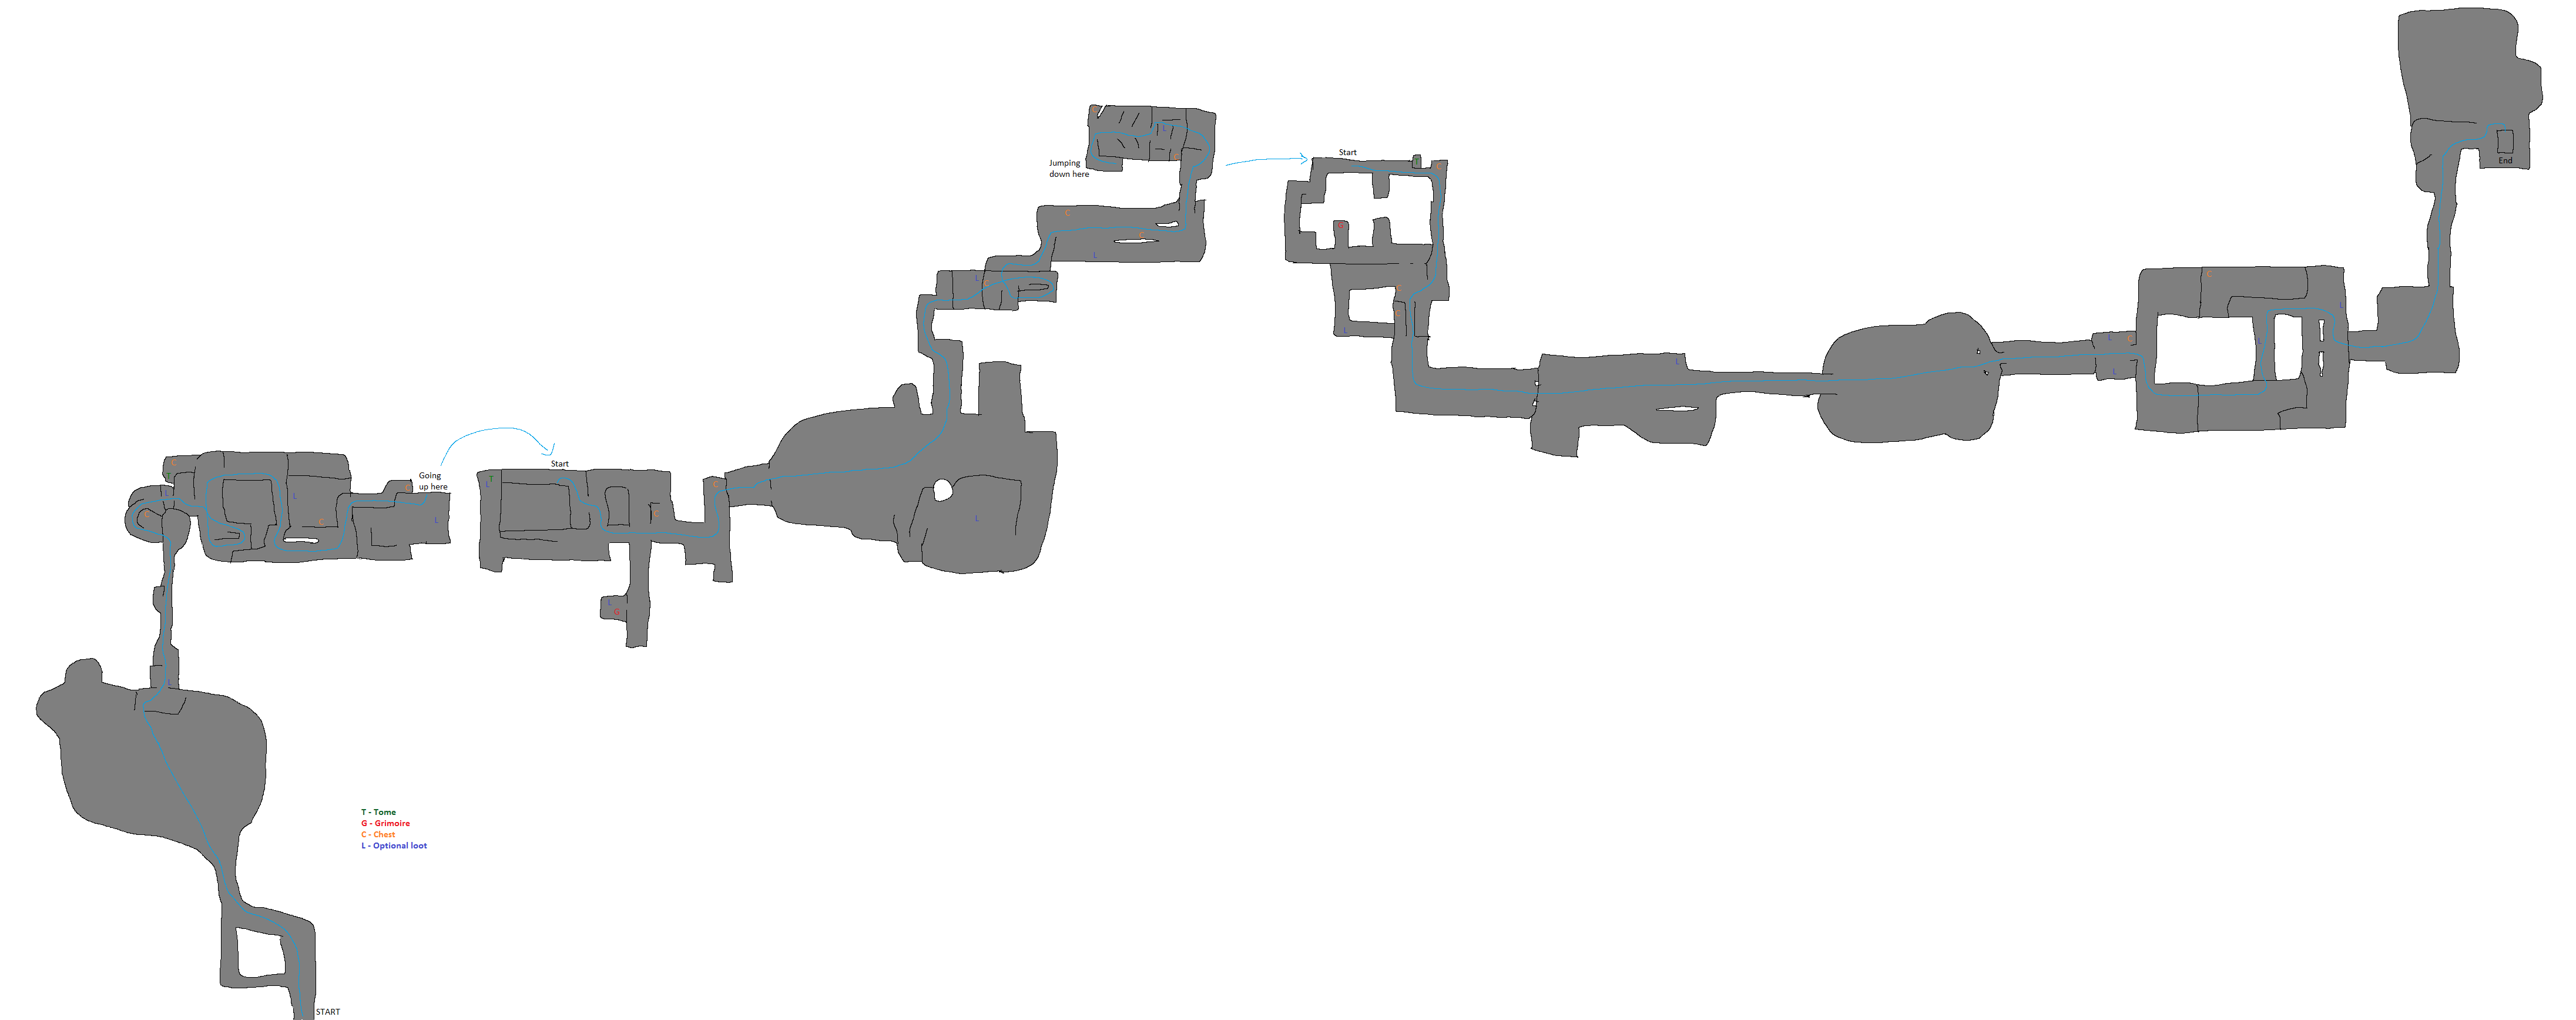
| Ubersreik | Act 1 | The Horn of Magnus • Smugglers Run • Supply and Demand • Black Powder • The Wizards Tower |
|---|---|---|
| Act 2 | Engines of War • Man the Ramparts • Garden of Morr • Wheat and Chaff | |
| Act 3 | Waterfront • Well Watch • The Enemy Below • The White Rat | |
| Last Stand | The Fall • Town Meeting | |
| DLC Missions | Drachenfels | Castle Drachenfels • The Dungeons • Summoner's Peak |
| Karak Azgaraz | Khazid Kro • The Cursed Rune • Chain of Fire | |
| Stromdorf | The Courier • Reaching Out | |
| Death on the Reik | Reikwald Forrest • River Reik | |
| Arrogance Lost | Trial of the Foolhardy | |